
User tutorial
Start a class
Before you begin: The touchscreen console
When you arrive in the room, go to the touchscreen console at the podium — it’s your dashboard for controlling your entire hybrid class.
Check the class displayed on screen: Check the schedule on the touchscreen console to identify your class.

Note: Scheduled classes appear automatically in the calendar according to your institution’s schedule.
Click “Join”
The live stream starts immediately after clicking the button.

Your class has started!
The number of connected students is shown in the top right. All of your room’s video sources are streamed live (board, projector, cameras…). Recording is automatic.

Main controls
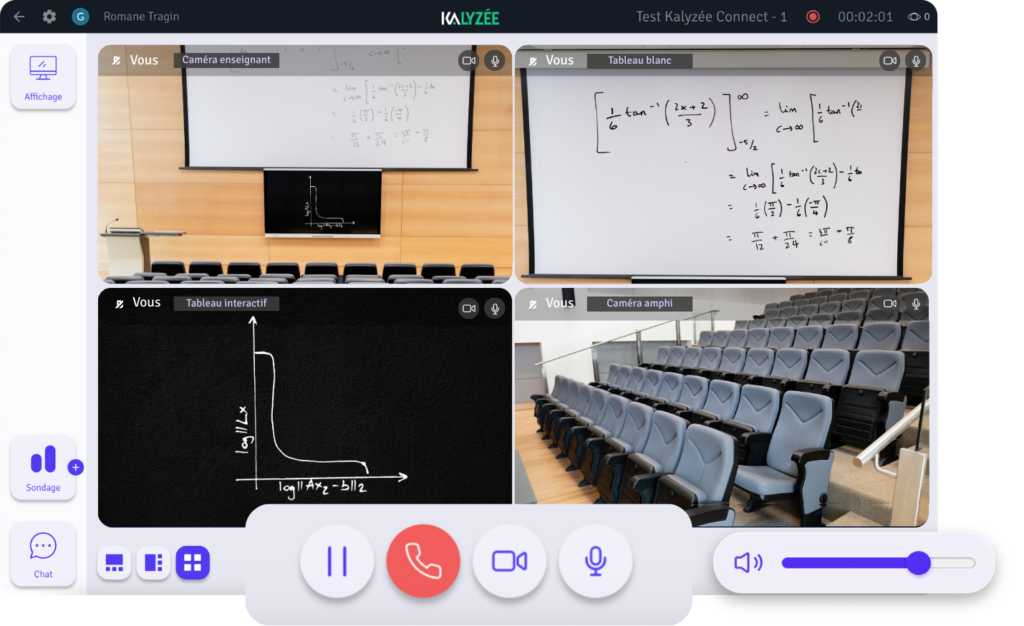

Pause
Pauses the class. Remote learners see “Class paused” and no longer see the room.

Cameras
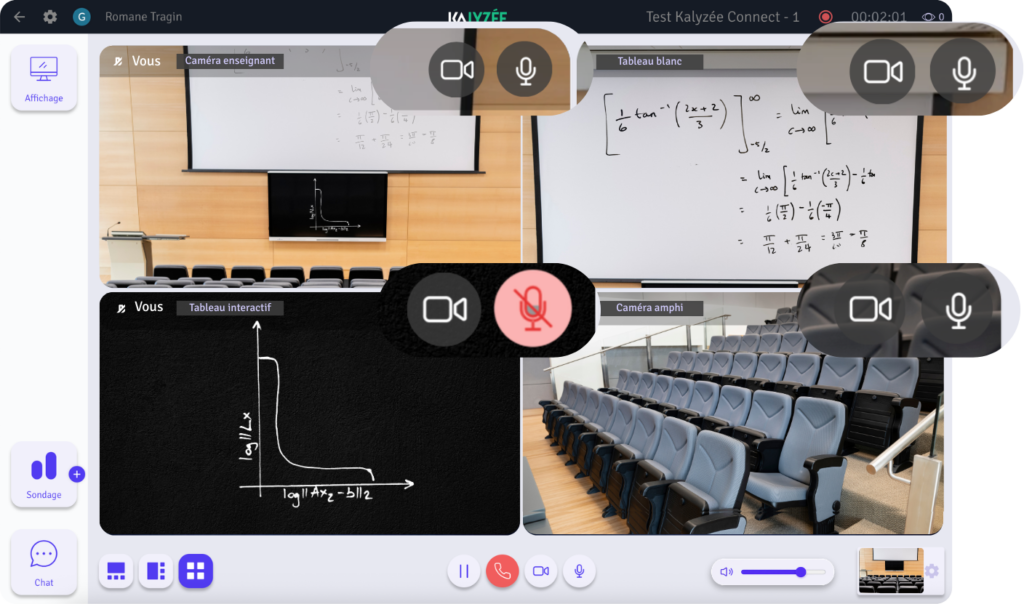
Turn all room cameras off/on with one click.

Microphones
Turn all room microphones off/on with one click.

Stop
End the session. If done by mistake, restart the class from the schedule.
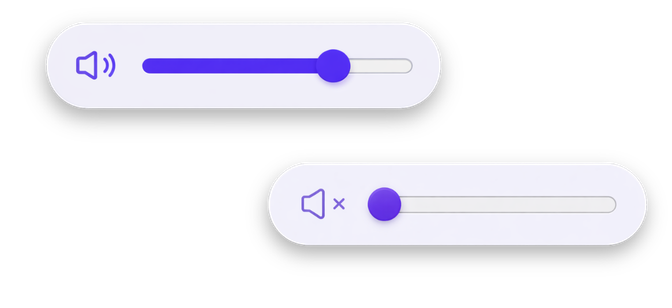
Room volume
Control the room’s sound volume (remote learners, video or audio content, etc.)
Note: You can also turn off the camera and microphone of each video source individually by clicking the corresponding icon.
Interact with your learners
Create a poll
Click “Poll”
The poll menu appears on the console.


Choose the poll type
6 options are available:
Yes / No
True / False
For / Against
Multiple choice
Stars
Custom
Custom poll
Create a custom poll by choosing:
- The question wording
- The number of possible answers
- The answers themselves
- The multiple-choice option: select “multiple answers allowed”

Publish the results
The number of responses and total participants is shown in real time. A chart shows the poll results live.
Once all students have answered, click “Publish the results” so learners can see the full results.

Note: The poll is also accessible in person. Simply scan the QR code in the room or use the institution’s mobile app.
Respond to Chat
Click “Poll”
The chat window appears on the console.
Click “Chat”
Learners can ask written questions via chat. The teacher clicks the “Chat” button at the bottom left and can reply in writing or simply out loud to participants’ questions or comments.

Bring someone to the board
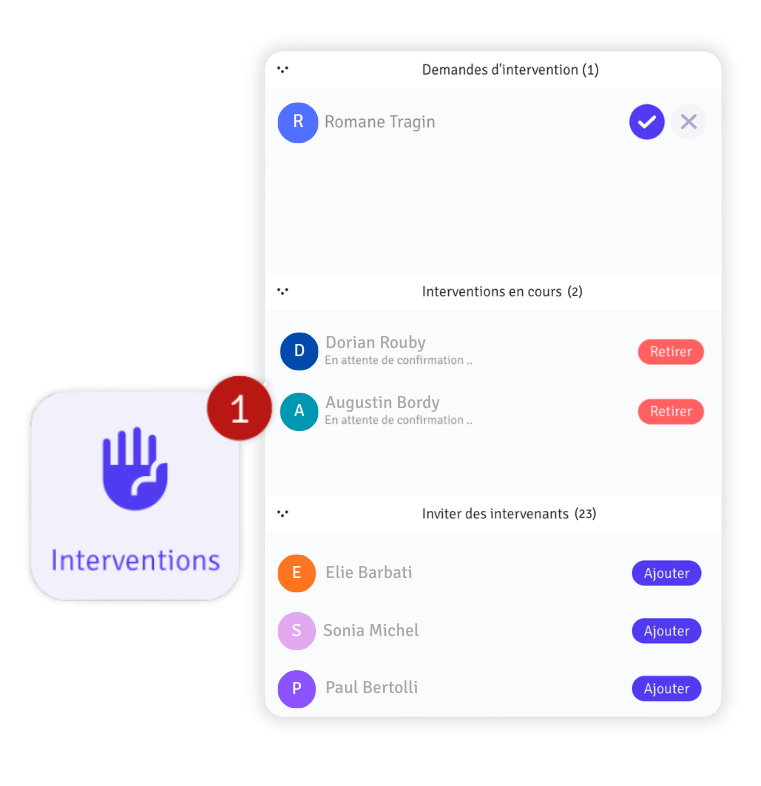
The “Interventions” feature lets you highlight one or more learners so they can present to the whole class (in-person + remote).
Click “Interventions”
The intervention menu appears on the console.
Click “Interventions”
The panel opens and displays three zones:
- At the top: Learners’ requests to intervene
- In the middle: Ongoing interventions
- At the bottom: The list of all learners online
What happens when a learner is “at the board”?
The learner is highlighted:
- In the room: Displayed large on the main screen (no longer in the background)
- Remotely: Appears as an additional video source
- Features: Can share their screen to present
Important: Several people can intervene at the same time.
Manage the video source display


Change the video source layout
The teacher can choose to display all video feeds in a grid, or switch to focus mode to enlarge one particular view.
User settings
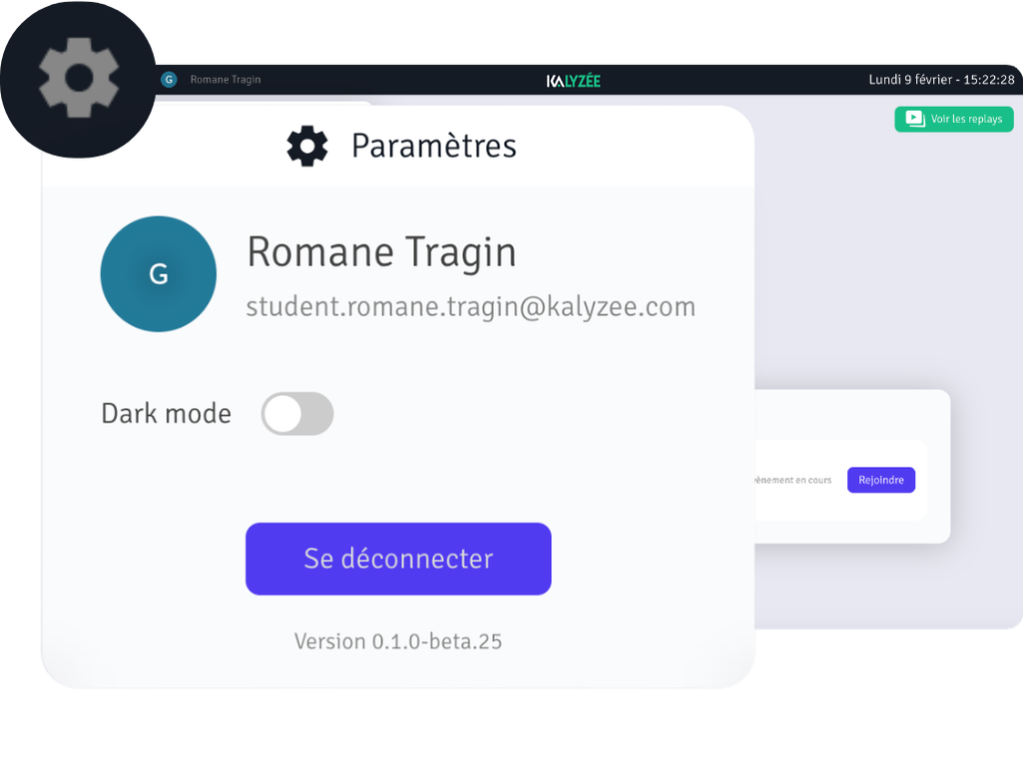
Dark mode / Light mode
From the user menu (top left of the screen), you can change the interface’s appearance.
Dark mode reduces screen brightness and improves visual comfort, especially during extended use or in low-light environments.
Light mode offers a brighter, higher-contrast display, suited to well-lit environments.
The change applies immediately and is saved for your next logins.
Log out
The user menu lets you log out of the platform.
⚠️ Important in the classroom:
In an equipped room, the session is usually opened with the account dedicated to the room, not with your personal teacher account.
In this case, it is not necessary to log out at the end of class.
Closing or stopping the class is enough to end the teaching session.
Logging out is only recommended if you’re logged in with your personal account, or if you’re working outside the equipped room.
Frequently asked questions
Can I share my computer screen?
Yes, connect your PC to the room’s projector or interactive board via HDMI — it will be automatically captured and streamed.
Can students access the replay even if they were present?
Yes, all recorded classes are available on demand for review, unless your institution has a different policy.
How do I know if my remote students can hear me well?
The number of connected students is shown in real time in the top right of your interface. You can also invite your students to confirm via chat. If audio issues are reported, check that the room’s microphones are turned on from the main controls.
What happens if my class is rescheduled?
If your class starts late, simply click “Join” in the schedule whenever you’re ready. Recording only starts at that point. Remote students cannot access the session until you’ve started it.
If your class changes time or room, the change must be made in the institution’s schedule. Kalyzée Connect syncs automatically: the updated class appears in the new room, and also appears in remote students’ schedules with the new times.
What happens if I finish my class 5 minutes late?
No automatic cutoff is applied. The class stays active until you click “Stop.” Recording stops at that same moment. Just be sure not to forget to end the session to free up the room.
Can I retrieve my poll results after class?
No, results are only shown live during the session.
What should I do if the touchscreen console doesn't respond?
Check that the screen is on and that the session isn’t locked. If the console remains unresponsive, contact your institution’s technical support or Kalyzée directly via support.kalyzee.com.
Join a live class
Access the platform
Open your browser
Open Chrome. Go to the URL provided by your institution (e.g., connect.your-school.com) or access the interface from your LMS.
Note – Recommended browser: Kalyzée Connect is optimized for Google Chrome. Using Safari or other browsers may cause malfunctions (microphone, camera, display). We strongly recommend using Chrome to avoid any technical issues.
Log in
Login credentials required
Contact your administration to obtain your username and password.
You may also be able to log in with your Google or Microsoft account, depending on your institution’s setup.

Join the room
Set up your devices
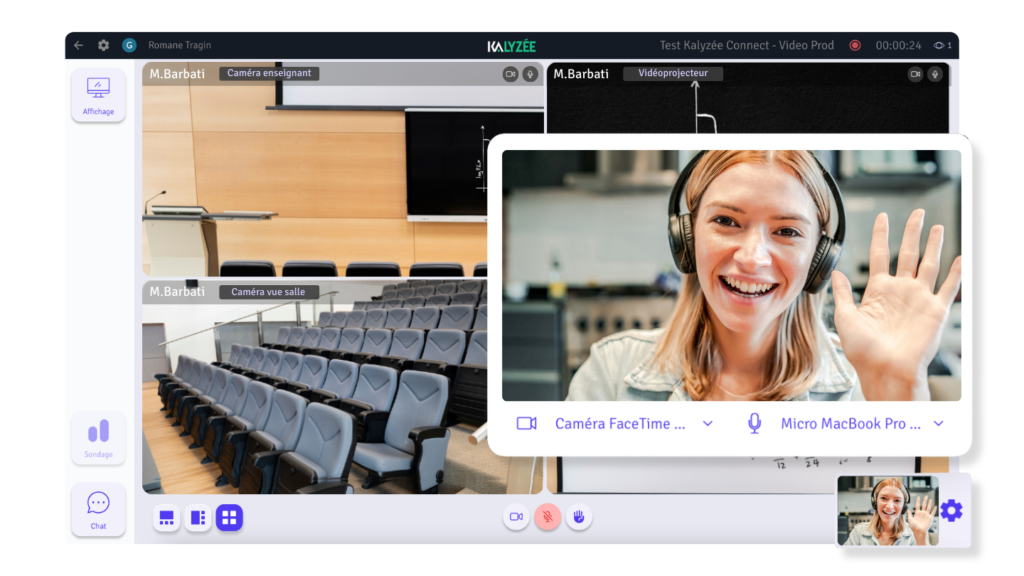
Before joining the class, a preview window appears to let you:
- Select your camera (if you have several)
- Select your microphone (headset, built-in mic…)

Join the class
You’ll see the list of your classes. The display is automatically filtered: you only see the sessions relevant to you. Click “Join” to enter the live session.
You’re connected!
You now see all of the room’s video feeds: teacher camera, whiteboard, interactive board, lecture hall camera…
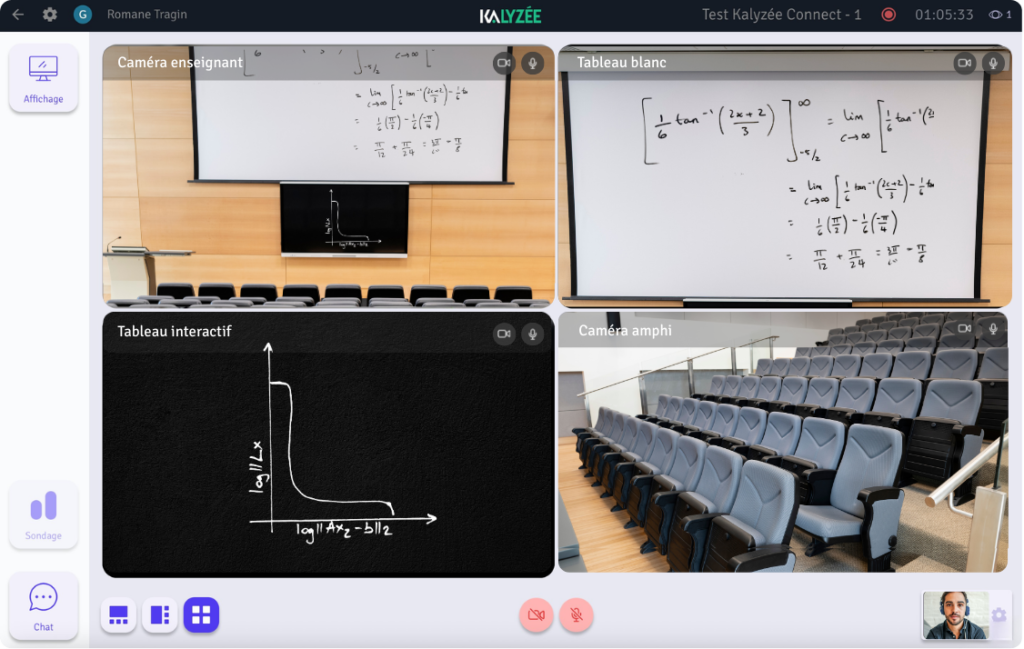
Room display
Immersion in the room
You see all of the room’s sources live:
Teacher camera
Traditional whiteboard
Interactive board / shared screen
Overview of the room (lecture hall camera)
The streaming sources displayed are configured according to your institution’s guidelines and may vary.

Customize your class display
- Change the layout : grid mode (all videos the same size) or focus mode (enlarge one particular view)
- Click a video to make it full screen
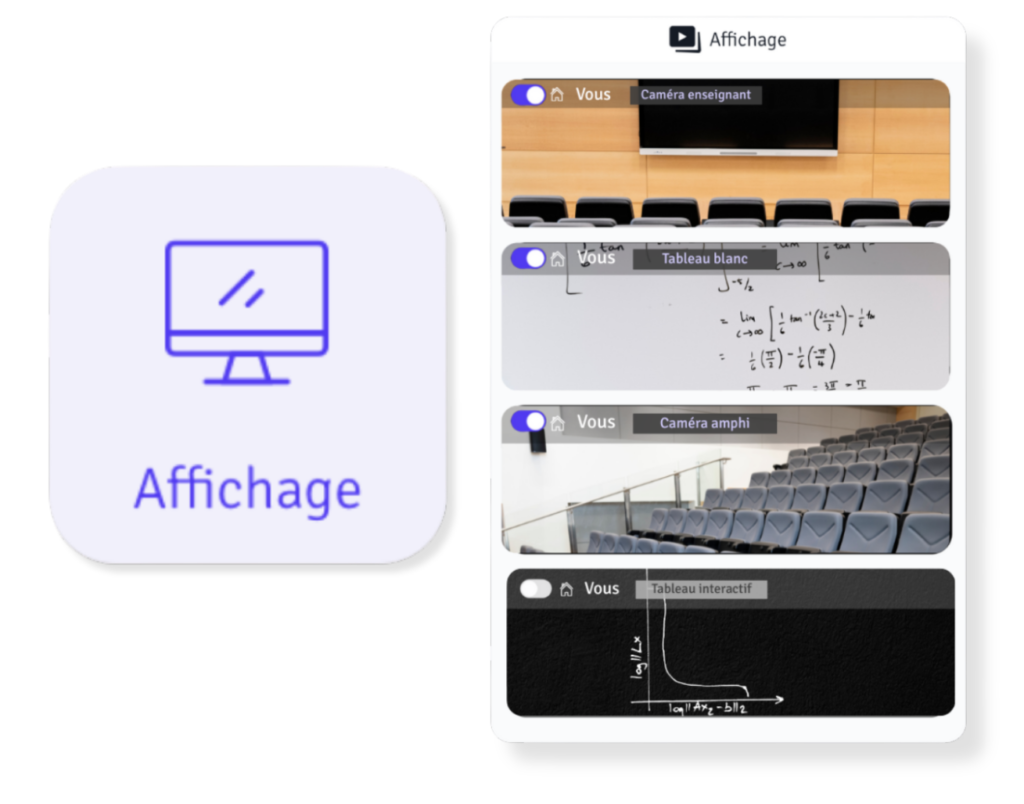
Show/hide certain video sources
You can also show/hide video sources that aren’t being used by the teacher, by clicking “Display.”
Interact with the room
Ask a question in writing
Use the chat
A chat is available throughout the class. You can type your questions directly in writing — the teacher reads them and responds, usually out loud. You can also react to other participants’ messages with emojis.
Ask a question out loud
Turn on your mic to be seen and heard in the room
When you turn on your microphone, you’re automatically shown in the room. Other participants (in-person and remote) can see and hear you.
At the bottom of your screen, you can: turn your camera on/off (camera icon), turn your microphone on/off (mic icon)
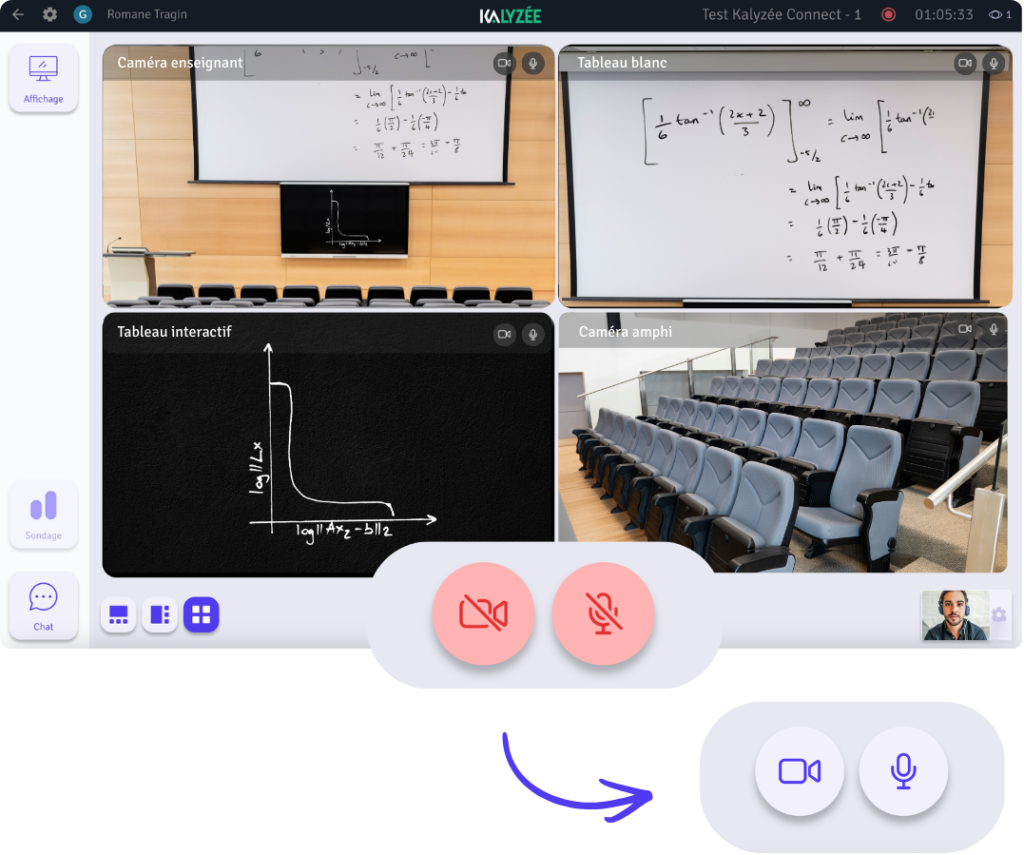
Best practice: Keep your mic muted when you’re not speaking to avoid background noise.
Manage your camera and mic devices
At any time during the class, you can change your audio and video devices by clicking the gear icon next to your preview in the bottom right of the screen.
Come to the board
Coming to the board puts you at the front of the room: your image is shown both in the physical room and to all remote participants. It's the ideal mode for presentations and talks, unlike simply speaking on the mic, which doesn't put you in the visual spotlight.
Ask to come to the board
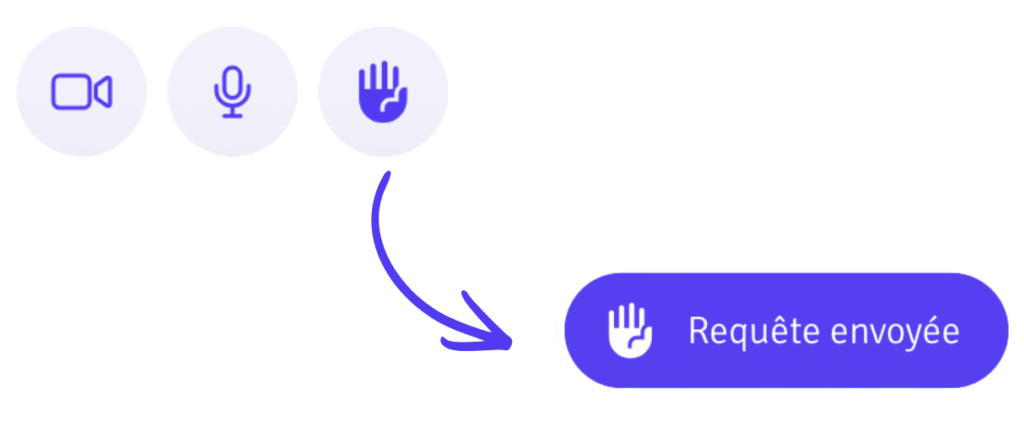
Click the hand icon at the bottom of the screen, next to the camera and mic controls. Remember to turn on your camera and mic before or during your time at the board so the room and remote participants can see and hear you.
Being chosen by the teacher
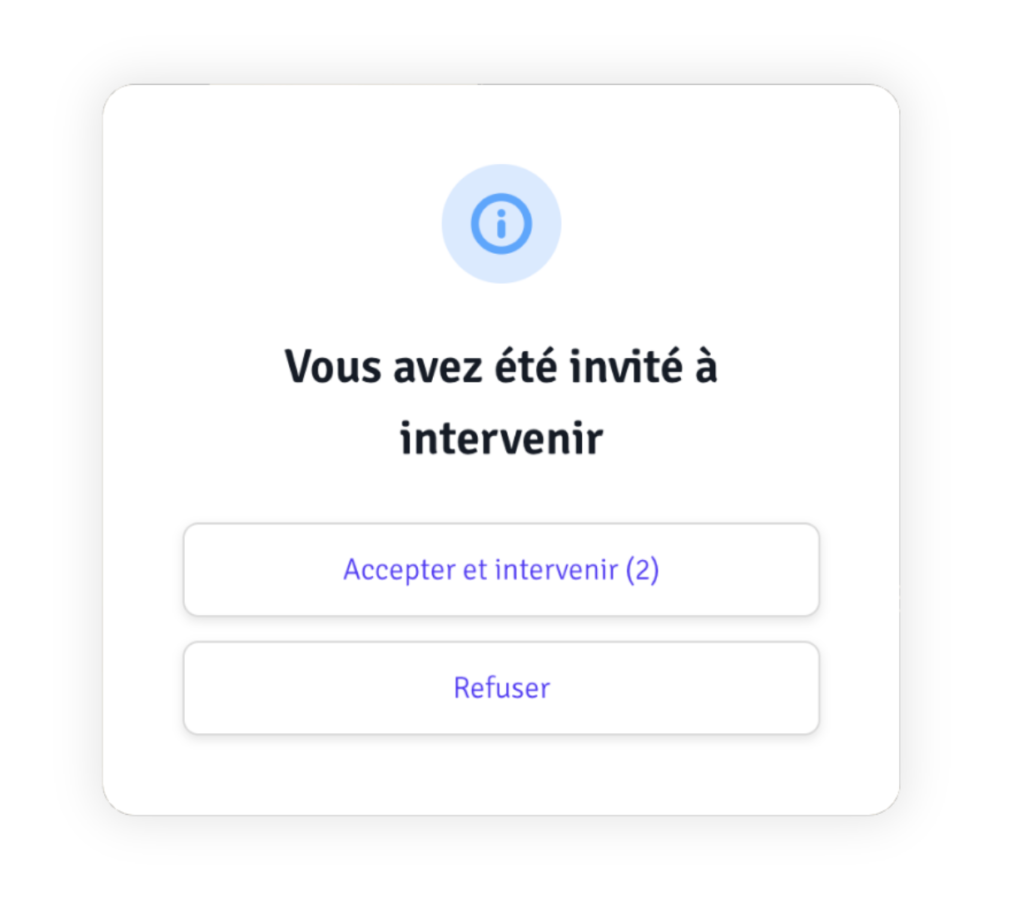
The teacher can also invite you to come to the board directly from their console. A window will then appear on your screen letting you accept or decline.
Take part in polls
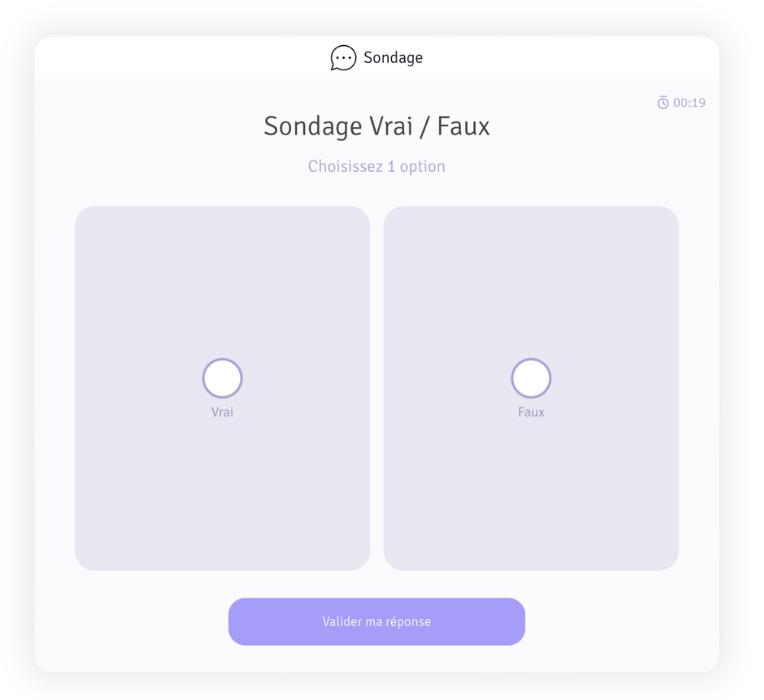
Open the poll
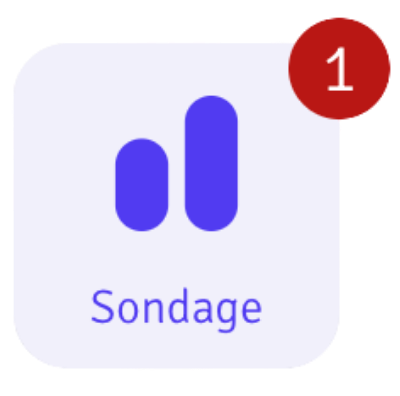
When the teacher launches a poll, a notification appears on the “Poll” icon on the left of your screen. Click it to open the poll and answer. You have the time allotted by the teacher to submit your answer — the poll closes as soon as they decide to close it.
Change your answer
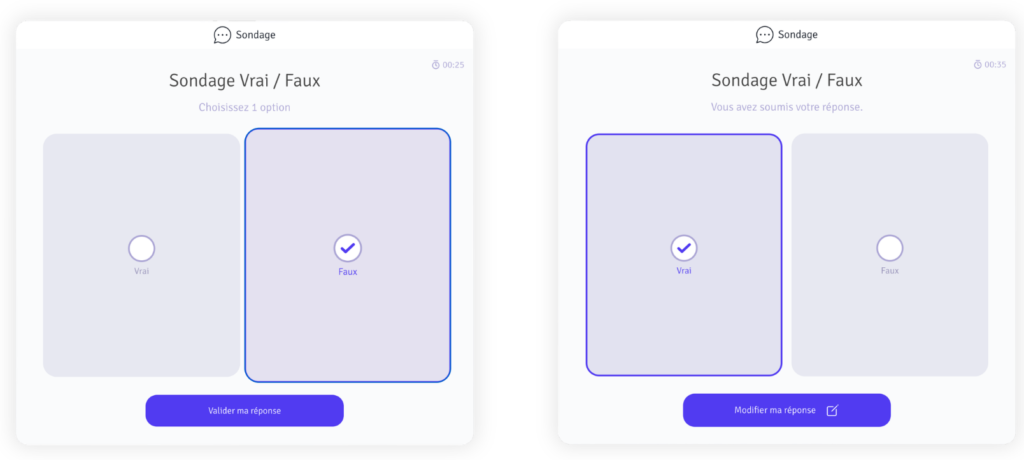
You can change your answer at any time while the poll is open. Click the new answer you want, then click “Change my answer” to confirm the change.
Displaying the results
Once the poll is finished, the results appear automatically on your screen.
Rewatch a class (Replay)
View all your classes to rewatch
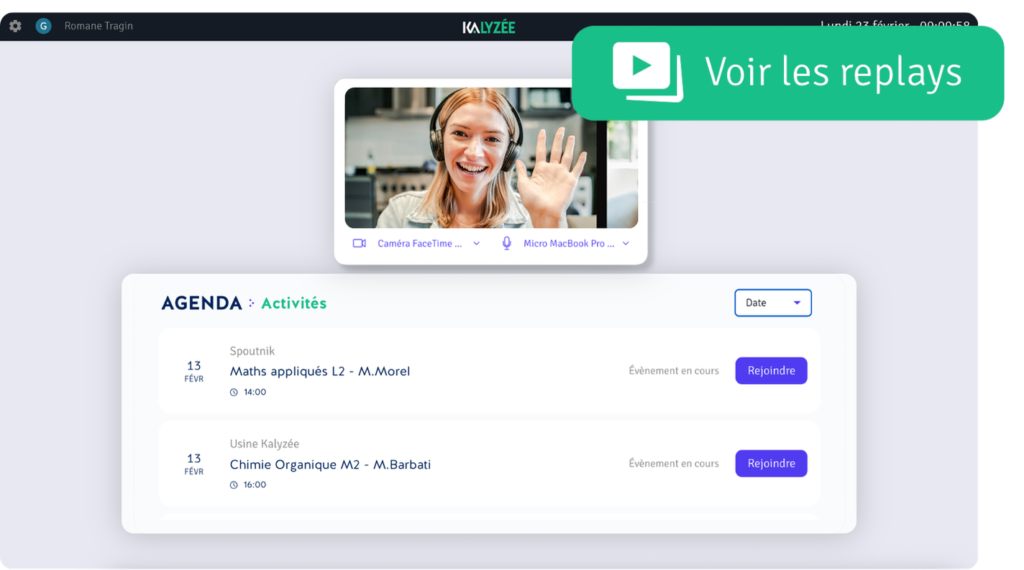
From the home page, click “View replays” in the top left to access all classes available for replay.
Choose the class to rewatch
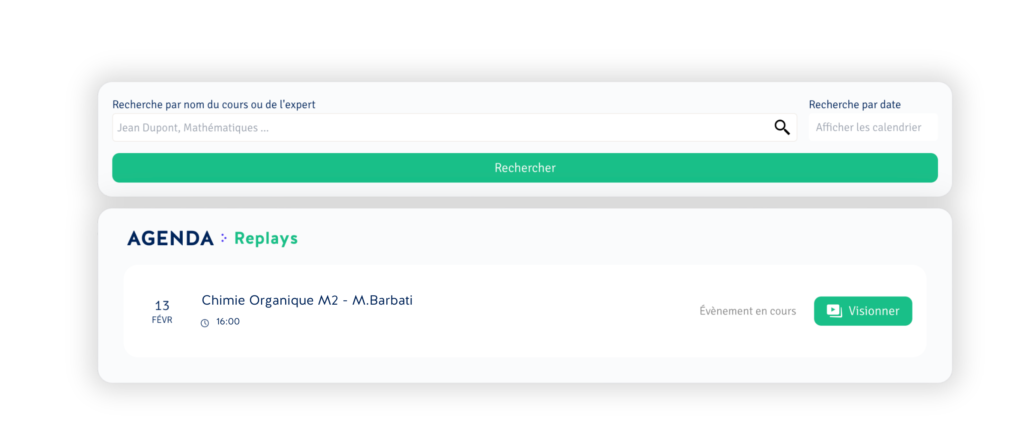
Select the class you want to rewatch directly from the list provided. You can also refine your search by date, class name, room, or teacher’s name.
Frequently asked questions
Can I access the replay even if I attended in person?
Yes. The replay is accessible to all students enrolled in the class, whether they attended in the room or connected remotely. Go to the home page and click “View replays” to find all recorded sessions.
I can't see all the room's cameras
The video sources displayed depend on your institution’s configuration and what the teacher has turned on. If a camera isn’t showing, click “Display” to check whether it’s hidden. If the problem persists, refresh the page, then contact your institution’s support.
I can't hear
First check that your device’s volume isn’t muted. Then make sure the correct audio device is selected in your Chrome browser settings. If the problem persists, reload the page.
What happens if my class is rescheduled?
If one of your classes changes time or room, you don’t need to do anything. Kalyzée Connect updates automatically: the class will appear in your schedule with the new times. The class shows up in your list and is then started by the teacher. If your class is slow to start, wait a few minutes and refresh the page. If in doubt, check with your institution.
What should I do if my connection drops during class?
Simply reload the page or close and reopen the tab. You’ll automatically rejoin the ongoing class. No further action is needed.
Is the replay available immediately after class?
The replay is usually available shortly after the session ends. Availability duration depends on your institution’s policy. You cannot download the replay directly from the platform.
What are the technical requirements for using Kalyzée Connect?
We recommend using a recent version of Google Chrome on a computer with a stable internet connection. A microphone and camera are needed if you want to speak or come to the board.
Everything is slow or choppy
The video lags, the sound cuts out, the page takes time to load.
All the issues, as you're experiencing them
I can't get into the class
The page stays blank or won't load
- Check that you’re using Google Chrome (not Safari, Firefox, or Edge).
- Try reloading the page:
Ctrl+Shift+R(PC) /Cmd+Shift+R(Mac). - Open a private browsing tab and try the URL again.
- Clear Chrome’s cache: Menu → Settings → Privacy → Clear data.
- Temporarily disable your Chrome extensions (especially ad blockers).
I don't know my login details / the password doesn't work
Your login details are provided by your institution. Contact your administration to retrieve or reset them.
Depending on your setup, you may also be able to log in via your Google or Microsoft account — check whether these options appear on the login page.
I get automatically disconnected in the middle of class
- Check your internet connection (see the “My connection is unstable” section).
- Avoid opening the platform in multiple tabs at the same time.
- If you’re on WiFi, try moving closer to the router or plugging in an ethernet cable.
- Disable apps that use bandwidth in the background (downloads, streaming…).
I see an error message I don't understand
Take a screenshot of the message and contact Kalyzée support via the chat at the bottom of the page. Specify your browser, your system (Windows/Mac/phone), and the time the error occurred.
I have a sound problem
I can't hear anything at all (neither the teacher nor the room)
- Check that your computer’s volume isn’t set to zero or muted.
- Check that Chrome has access to sound: click the 🔒 padlock in the address bar → Sound → Allow.
- Check that the correct audio device is selected in the setup window before joining the class.
- If you’re using headphones, unplug and replug them, then reselect them from the list.
- Restart Chrome and try again.
No one can hear me (my mic isn't working)
- Check that your mic isn’t turned off at the bottom of the screen (crossed-out mic icon).
- Chrome → 🔒 padlock → Microphone → Allow.
- In your computer’s system settings, check that the correct mic is set as default.
- Test your mic in another tool (e.g., Google Meet) to check it’s working.
The sound is choppy, it cuts in and out
This is usually related to an unstable internet connection. See the “My connection is unstable” section to fix this issue.
If your connection is good, try closing other resource-heavy tabs and apps.
I have a video or display problem
My camera shows a black image or doesn't display
- Chrome → 🔒 padlock in the address bar → Camera → Allow.
- Check that another app (Zoom, Teams, Skype, or another browser) isn’t already using your camera — close them.
- Unplug and replug your external webcam.
- In the class setup window, change the selected camera from the dropdown menu.
- Restart Chrome completely (close all windows).
I can't see the board / the teacher's screen
- Check that the source isn’t hidden: click “Display” to enable all video sources.
- Try switching to grid mode to see all available feeds.
- If the feed is missing, the teacher may have turned off that source — wait or report it via chat.
The video is frozen or poor quality
This is almost always caused by the internet connection. See the “My connection is unstable” section.
You can also close unnecessary tabs and pause ongoing downloads to free up bandwidth.
My connection is unstable or slow
How do I know if my network is the problem?
Test your speed at fast.com or speedtest.net. Kalyzée Connect requires a minimum of:
- 5 Mbps download to watch
- 2 Mbps upload to turn on your camera
If your speed is fine but it’s still lagging, the problem is probably your computer.
I'm on WiFi and it's lagging — what should I do?
- Move closer to your router or WiFi access point.
- Connect your computer via ethernet cable if possible — it’s much more stable.
- Restart your router (unplug for 30 seconds, plug back in).
- Check that no one else on your network is downloading or streaming at the same time.
My connection is good but it's still lagging
- Close other open Chrome tabs.
- Close background apps (Slack, Teams, Zoom, OneDrive…).
- Temporarily disable Chrome extensions.
- Restart your computer.
The interface isn't displaying correctly
Buttons or menus aren't responding / the display is broken
- Make sure you’re using an up-to-date version of Google Chrome — other browsers can cause display issues.
- Reload the page:
Ctrl+Shift+R/Cmd+Shift+R. - Disable Chrome extensions (ad blockers first).
- Clear your browser’s cache.
I can't see my class in the schedule
Classes appear automatically according to your institution’s schedule. If a class doesn’t appear:
- Reload the page
- Check that you’re logged in with the correct account
- Contact your administration to check that you’re properly enrolled in the session
I don't know how to change the video layout
At the bottom of the interface, use the layout buttons to switch between:
- Grid mode: all video sources the same size
- Focus mode: one source enlarged full screen
You can also click directly on a video to make it full screen, and use the “Display” button to hide unused sources.
I'm a teacher — specific issues
Can I share my computer screen?
Yes, connect your PC to the room’s projector or interactive board via HDMI — it will be automatically captured and streamed.
I stopped the class by mistake — how do I restart it?
Go back to the schedule from the touchscreen console and click “Join” again to restart the session. Recording will resume automatically.
How do I know if my remote students can hear me well?
The number of connected students is shown in the top right. You can ask them to confirm via chat, or use a quick “Yes/No” poll to check audio quality.
Can students access the replay even if they were present?
Yes, recording is automatic from the start of the class. All learners, whether present or remote, can access the replay from their space once the session has ended.
What happens if my class starts late or runs past the scheduled time?
You can start and end the class freely. The session stays open until you click “Stop.” If you finish after the scheduled time, the session continues normally.
I have a hardware problem
The camera is pointing in the wrong direction
Camera setup can be done directly from your interface. Switch to focus mode and enlarge the video source you want to adjust, then use the direction arrows and the magnifying glass to point and zoom the camera.
If these controls don’t appear, the feature has been disabled by your administrator — contact them to get access.
I can't see the board / the teacher's screen
- Check that the source isn’t hidden: click “Display” to enable all video sources.
- Try switching to grid mode to see all available feeds.
- If the feed is missing, the teacher may have turned off that source — wait or report it via chat.
Need more help? Contact Kalyzée support
Can't hear anything?
Is it normal for there to be no sound?
In many cases, silence is simply due to a lack of audio activity. Ask yourself these three questions:
Student microphones: Is a student currently speaking with their mic on?
Ongoing interventions: Is there an outside participant whose mic is on?
Media content: Are you playing a video or audio file in the room?
If the answer is No to all three questions, it’s completely normal not to have sound.
Still silent despite activity?
If content is supposed to be playing but you still can’t hear anything, follow these verification steps in order:
Check the room console: Look at the bottom right of the interface.
- Check that the volume icon isn’t crossed out (Mute).
- Drag the slider to the right to increase the volume.
Check outside participants: Make sure (via chat if needed) that their mic is turned on on their own interface. If it’s crossed out in red for them, no sound will reach the room.
Check your own equipment: If you’re sharing content from your computer (video, presentation with sound), make sure your PC’s volume isn’t set to “Mute” or too low at the operating system level.
Problem persists? Take action
If the basic checks didn’t help, it might be a connection glitch or a hardware issue.
Refresh your page: A simple click on your browser’s “Refresh” button (or the F5 key) fixes most audio streaming issues.
Ask the participant: If you still can’t hear the other person, ask them (via chat) to refresh their page too. The issue may be coming from the signal source.
Last resort: Technical support
If none of the previous steps restored the sound, the problem is likely related to the room’s hardware or a network failure.
Contact your administrator: A technician can check whether the physical connections (cables, speakers) are working.
Submit a ticket: Open a support request via your usual platform, specifying the tests already carried out.
Is there actually supposed to be sound?
First, check whether someone is supposed to be speaking:
Does the participant have their mic turned on (mic icon not crossed out next to their name)?
Is another student currently speaking?
Is a video currently playing?
Note: If there’s no activity and no one is speaking, the silence is normal!
Check your audio settings
If the class has started but you can’t hear anything:
- On your computer:
- Check that your PC/Mac’s sound isn’t set to Mute.
- If you’re using headphones or earbuds, check that they’re properly plugged in or connected via Bluetooth.
- In your browser: Look at the room’s tab at the top of your screen. If there’s a small crossed-out speaker icon on the tab, right-click it and choose “Unmute site”.
Backup solutions
If everything looks fine but the silence continues:
Refresh the page: Press F5 or click the “Refresh” icon. It’s the magic fix in 90% of cases.
Report the issue: If you still can’t hear anything after refreshing, post a message in the Chat to ask if other students can hear.
If no one can hear: The participant needs to refresh their page.
If you’re the only one: Check your audio output settings in your browser’s settings.
Need more help? If nothing works, try switching browsers (Chrome is recommended) or contact your institution’s technical support.
Can't get your camera to show?
Turn cameras back on from the console
On the touchscreen console at the podium, check that the camera icon isn’t crossed out. Click “Cameras” to turn all of the room’s video sources back on with a single click.
Check the source shown on screen
Click the “Display” menu at the top left of the console, then check the enabled and disabled sources one by one to make sure the video source you’re looking for is actually shown on screen.
Refresh the page
A simple click on your browser’s “Refresh” button (or the F5 key) fixes most video display issues. If the problem is coming from an outside participant, ask them to do the same, then check the “student” tab.
Contact technical support
If none of the previous steps restored the image, the problem is probably hardware-related. Contact your administrator to check the cameras’ physical connections, or submit a support ticket specifying the steps already tried.
Check that your camera is turned on
On your interface, make sure the camera icon isn’t crossed out in red. Click it to turn it on if it isn’t already.
Check your camera preview
Once turned on, check that the preview actually shows your image. If the preview is completely black, go to the settings in the bottom right and check the selected device — the wrong camera may be selected by default.
Check that no other app is using your camera
A camera can only be used by one application at a time. Close all other browser tabs, as well as any other app that might be using your camera (Zoom, Teams, FaceTime, etc.), then try again.
Refresh the page
A simple click on your browser’s “Refresh” button (or the F5 key) may be enough to restore your camera display. Try turning your camera on again after reloading.
Test your camera outside the app
If your preview stays black, check that your camera works properly outside the app — via your computer’s Camera app or another program. If it doesn’t work there either, the problem is hardware-related and your camera needs to be checked.
Submit a support ticket
If your camera works fine on other applications but still can’t be turned on on the platform, submit a support ticket specifying the steps already tried.
Everything slow or choppy?
Restart the class
Let your students know, leave the class by clicking the red button, then join it again from the calendar.
Check your network connection
If the problem persists, check your internet connection with your administration.
Technical support
If none of the previous steps restored the sound, the problem is likely related to the room’s hardware or a software failure.
Contact your administrator: A technician can check whether the physical connections (cables, speakers) are working.
Submit a ticket: Open a support request via your usual platform, specifying the tests already carried out.
Refresh the page
Press F5 or click the “Refresh” icon. It’s the magic fix in 90% of cases.
Check your browser
Check that you’re using Chrome as your browser.
Check your internet connection
Test your internet connection (a tool like speedtest.net can help you spot an issue).
Close other applications
Close resource-heavy applications on your computer (streaming, ongoing downloads…).